
You might encounter scenarios when deploying Bluefort TAPP Finance for GoCardless or Bluefort LISA BusinessPro with GoCardless payments where you already had GoCardless customer mandates created in another legacy system. This article will show you how you can link the mandates created in your legacy system to customer records within the Accounts Receivable / Sales Ledger module of Microsoft Dynamics 365 Finance and Operations.
Why is this needed?
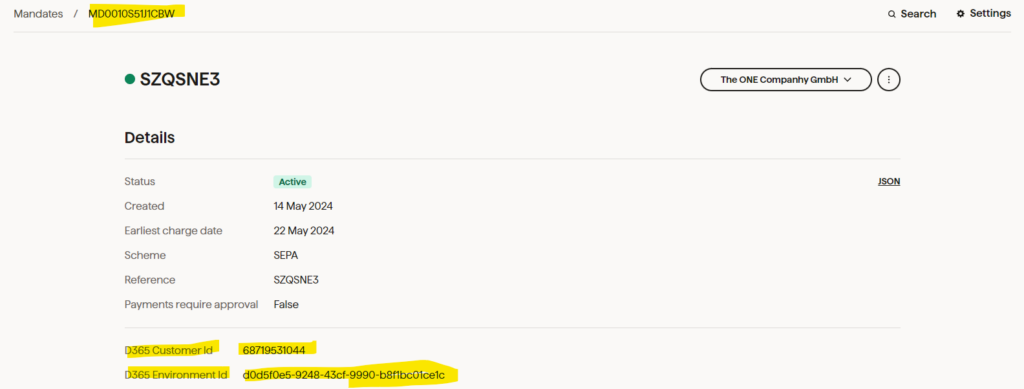
When mandates are created from within Bluefort TAPP, mandates are decorated with custom meta-data properties that link the mandate with a specific environment/legal entity combination and a specific customer (via FO RecId). This is shown in the screenshot below.
However, this is, of course, not the case for GoCardless customer mandates that were originally created in a legacy system so these needs to be linked to the correct customer accounts within the correct company in Microsoft Dynamics 365 Finance and Operations.
High Level Steps
The following high level steps are needed in order to achieve the goal:
- Import your customers into the AR / Sales ledger of your Microsoft Dynamics 365 Finance and Operations company
- Run the mandate reconciliation.
- Link the existing GoCardless customer mandates to the customers (imported in step 1).
Running the Mandate Reconciliation
The mandate reconciliation can be executed from one of the following locations:
- Enterprise Subscription Automation (ESA) -> Periodic Tasks -> GoCardless -> GoCardless mandate reconciliation
- Enterprise Automation (EA) -> Periodic Tasks -> GoCardless -> GoCardless mandate reconciliation
- Enterprise Subscription Automation (ESA) -> Inquires and Reports -> GoCardless -> GoCardless mandates -> (Form Ribbon) General -> GoCardless -> Mandate reconciliation button
- Enterprise Automation (EA) -> Inquires and Reports -> GoCardless -> GoCardless mandates -> (Form Ribbon) General -> GoCardless -> Mandate reconciliation button
The logic is the same no matter from where the reconciliation is triggered, however, the ESA paths are only available if there is a LISA BusinessPro license deployed in the environment.
The resulting mandates synchronized from GoCardless can be seen in the GoCardless mandates list page within the Inquires and reports sub-menu in any of the two modules. At this point, GoCardless mandates created from a legacy system are not yet linked to a specific customer account because, as described earlier in this article, there is no metadata holding the link. The link will be created in the next step.
Link the existing GoCardless customer mandates to the customers
This section describes the final step of the process. The link between GoCardless mandates and FO customer accounts will be done by importing a file containing this information. These are the steps.
- Login to the Microsoft Dynamics 365 Finance and Operations client and browse to the Data Management workspace.
- Click on the Export tile
- Type in a Group name
- Click on Add entity
- Choose / type Customer mandate mapping as the entity name and proceed to choose your favourite file format (e.g. MS Excel)
- Click Add
- Export the template from the header
- When the export is ready click on Download file
- Open the downloaded file (e.g. MS Excel file) and you should be presented with the columns below

10. For each and every GoCardless mandate created in the legacy system which you want to link to an existing customer in Microsoft Dynamics 365 Finance and Operations create a row with the following values:
GOCARDLESSMANDATEID – the GoCardless mandate id of the mandate created in the legacy system (typically starts with MD). – Mandatory
CUSTACCOUNT – the unique customer account of the customer in Microsoft Dynamics 365 Finance and Operations (note: this the customer id not the customer name). – Mandatory
EMAIL – the primary email of the customer. Note: If the customer already has a primary email a new primary email will be created and the existing email marked as non-primary. Please also note that a customer must have a primary email for the link to succeed. This can be created prior to this import or via this field of the import). – Not Mandatory
GOCARDLESSCUSTACCOUNT – this field is only used for validation purposes since the GoCardless customer id of the mandate is already synchronized as part of the mandate reconciliation in step 2. However, it is still recommended to populate this field in the interest of data accuracy. If left empty, the GoCardless customer id validation is skipped – Not Mandatory
PROCESSEDONCE – Please leave this column empty for all rows being imported. – LEAVE EMPTY
Once the file is correctly populated, the next step would be to import it into Microsoft Dynamics 365 Finance and Operations:
- Login to the Microsoft Dynamics 365 Finance and Operations client and browse to the Data Management workspace.
- Click on the Import Tile
- Type in a Group name
- Click on Add file
- Enter a source data format (matching the data format you used when exporting the file earlier)
- Choose / type Customer mandate mapping as the entity name and proceed to the populated file from your device
- Click on Upload and add
- Import the file from the Import button on the header
- When the import is completed browse to one of the following paths:
- Enterprise Subscription Automation (ESA) -> Inquires and Reports -> GoCardless -> Existing customer mandates migration form
- Enterprise Automation (EA) -> Inquires and Reports -> GoCardless -> Existing customer mandates migration form
- The logic is the same no matter from where the reconciliation is triggered, however, the ESA paths are only available if there is a LISA BusinessPro license deployed in the environment.
- Here the records which were imported via the uploaded file can be reviewed. For new freshly imported records the Processed once flag will be empty (unticked).
- Once you are sure you want to create the link between the FO customer records and the GoCarless mandate records you can click on (Form Ribbon) General -> Customer mandates -> Process new mappings. The process can be run synchronously or in batch. It is recommended to run the process in batch if a significant amount of records are to be processed.
- Any errors encountered are presented on the client or in the batch log of standard D365 (when run in batch).
- For successfully processed records the Processed once flag becomes ticked.
- If, for any reason, these would need to be processed again (maybe to fix data issues) these can be processed again from (Form Ribbon) General -> Customer mandates -> Re-process processed mappings.
- If you are sure that the records have been processed and linked correctly then records in this table can be cleaned up using (Form Ribbon) General -> Customer mandates -> Delete processed mappings.