
Introduction
A project is the container for one piece of work in ARVO Studio. This article shows you how to create one, what to attach to it and what to enter, so that the project is ready for the stages that follow.
Creating a project takes only a few minutes however the crucial aspect goes into what you attach to it, because those documents are what ARVO works from.
Before you start
Make sure ARVO Studio is installed and activated in the sandbox you are working in, and that setup has been completed for that environment. Have the solution design document ready, along with any company background, role definitions or author notes you intend to supply.
Create the project
- Open the Projects list and choose New Project.
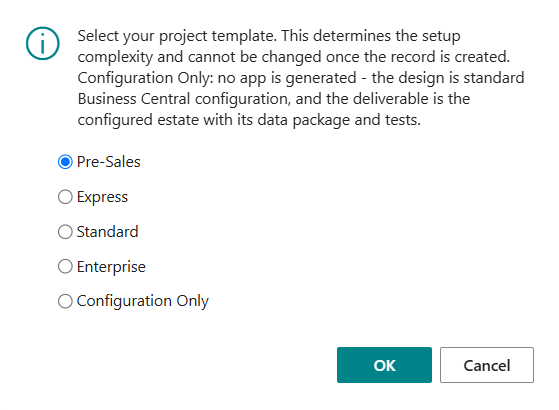
- You are asked to select your project template. Choose the correct one and continue. More information about the project templates can be found in the next section below title project templates.
- Attach the solution design document.
- Optionally add company context.
- Optionally add role context.
- Optionally add author notes.
- Complete the description, the output name, the publisher and the object prefix.
Project templates
You can setup a default in the ARVO Studio parameters and when you create a new project a dialog is presented to select the desired template. The default option is inherited from the ARVO Studio Parameters which an explanation of the options is shown below:
- Pre-Sales – goes directly from Document Input to code generation while deploying to production environments will be blocked.
- Express – allows only 1 main job queue with 1 approval gate and light deliverables. You can view progress of the job queue from the compass and start reviewing documents whilst it is still running.
- Standard – allows 2 job queues with 1 approval gate each – one for the functional deliverables and one for the technical deliverables. You can view progress of the job queues from the compass and start reviewing documents whilst they are still running.
- Enterprise – This is main enterprise template and allows for 1 approval gate per step. This also requires freezing the test suite before code generation.
- Configuration only – this allows you to get ARVO Studio to configure one or more BC companies for you, even if your project has no gaps to build code for.
The intake attachments
Four attachments make up the intake for a project. Only the first is required, but each of the others gives ARVO more to work with.
| Step | What happens and what you do |
| Design Doc | Attach the solution design document. Everything starts here. A strong design document sets out clear requirements and, wherever possible, acceptance criteria. |
| Company Context | Optional. Add company background so the analysis reflects the customer’s real business context. |
| Role Context | Optional. Add role definitions so ARVO can establish the personas used later in testing. |
| Author Notes | Optional. Add any instructions or constraints from the person who wrote the design document that should be respected throughout the project. |
The four intake attachments directly affect the quality of the work that follows. Better requirements and better context produce better designs, tests and output.
So it is worth spending the extra time here. Make the requirements explicit, state acceptance criteria wherever you can, and use the optional attachments to tell ARVO about the customer’s business and the roles involved rather than leaving it to be assumed or being generic.
The context you attach also carries further than the first stage. Company, industry and role context sharpen the design, the persona tests and the user-acceptance assignments later in the project, so the time you spend describing the customer’s business and the roles that work in it is repaid at every stage that follows later on.
Scope and the target environment
Scope and the target environment are fixed at intake. The areas that are excluded, the object ranges ARVO Studio is allowed to use and the dependencies the solution relies on are recorded on the project before anything is generated. Settling those boundaries at the start keeps the work inside what was agreed, rather than leaving it to be discovered once designs and output already exist.
Quick check
The project has been created correctly when it appears in the Projects list, the design document indicator on the project card shows that the document is attached, and the description, output name, publisher and object prefix are all completed.