This article explains how you can onboard your already existing Stripe account to TAPP Stripe for Microsoft Dynamics 365 Business Central or create a new account to be onboarded.
Contact Bluefort support on support@bluefort.eu if you have any questions.
Pre-requisites
- Credentials for the Stripe Account/s to onboard.
- Identify a Payment Success URL and Payment Cancel URL to set for the Stripe Account that will be onboarded to Business Central. These parameter URLs can be modified after they have been defined during the initial onboarding.
- Payment Cancel URL: this is the web page your customers will be re-directed to once the payment has not been successful.
- Payment Success URL: this is the web page your customers will be re-directed to once the payment has been successful.
Onboarding a Stripe Account
N.B. TAPP Stripe for Microsoft Dynamics 365 Business Central allows the onboarding of one or more Stripe accounts in one Business Central company. Each Stripe Account is to be onboarded separately.
Onboarding an already existing Stripe Account
To onboard an already existing Stripe Account, navigate to the Stripe Accounts page and click on Run Stripe Onboarding Wizard.

The launched Stripe Account Onboarding Wizard will walk you through the steps required to onboard a Stripe Account in the currently opened company.
Step 1
The first screen in the wizard is the Welcome screen, designed to initiate the onboarding process.
Click on Next to proceed.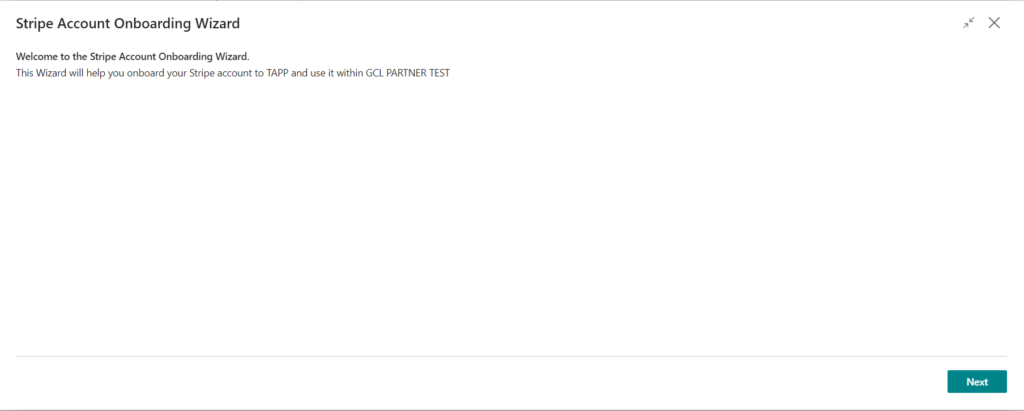
Step 2
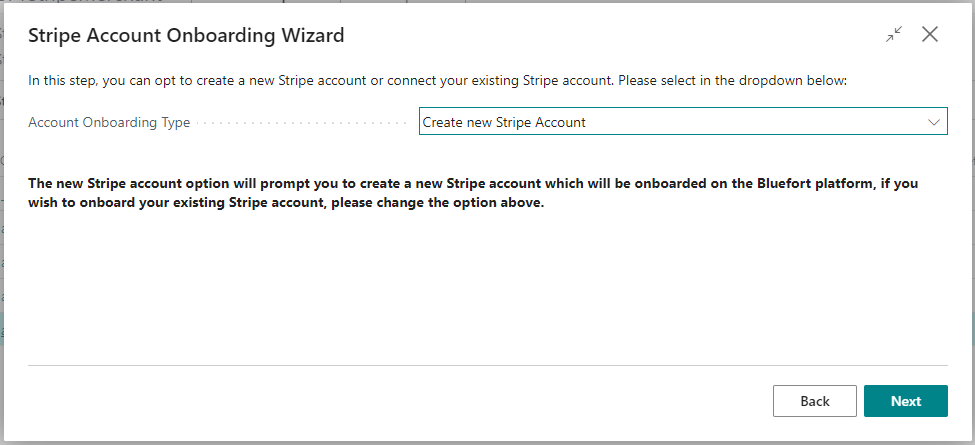
In this step, the wizard provides both options to either create a new Stripe account or connect your existing Stripe account. In the account Onboarding Type dropdown, select Onboard existing Stripe Account, then click on Onboard Existing Account.

You will be automatically redirected to the Stripe login page.Log in to Stripe with your credentials.
Once logged in, the list of your existing Stripe Accounts will be displayed – choose which account you want to onboard and click on Connect.
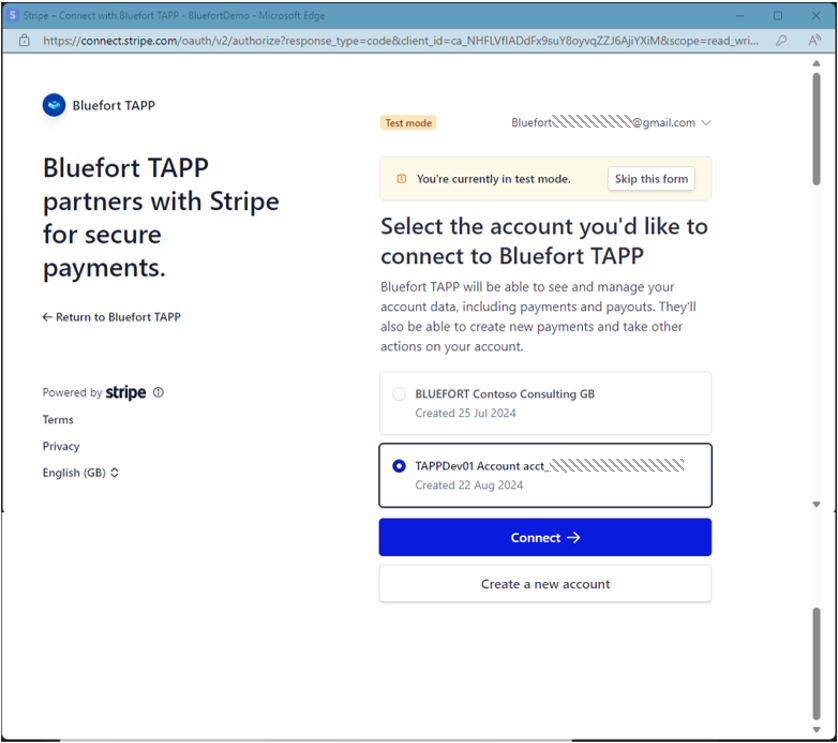
N.B. Sandbox accounts and accounts already linked with a different platform are currently not supported and will be shown as ineligible.
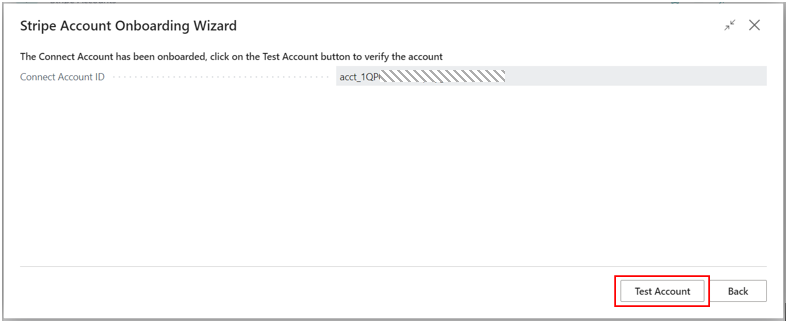
Once you click on Connect, you are redirected back to the wizard in Business Central. If the account was successfully connected, the Connect Account ID is shown in the wizard.
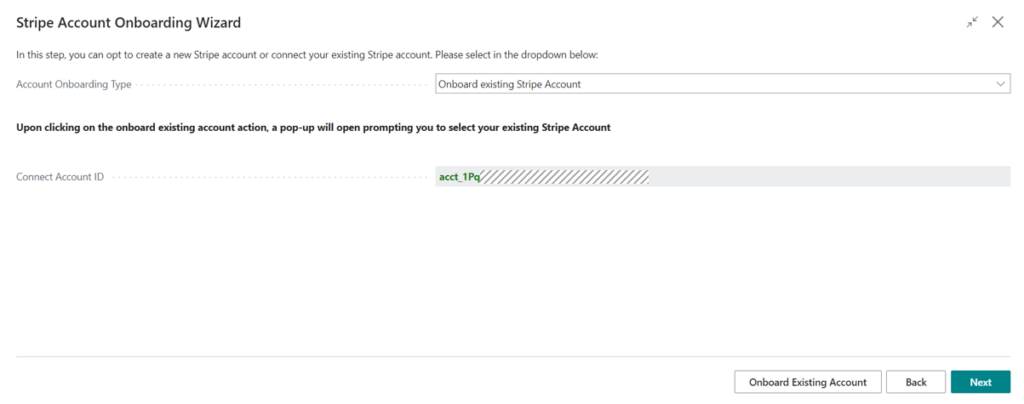
Click on Next to proceed to the next step.
Step 3
In this step, additional details about the Stripe Account are to be provided.
- Account Name: Insert a name to identify the Stripe Account throughout the use of the account in Business Central.
- Admin Email: Insert the Stripe account email or an admin email address.
- Payment Cancel URL: this is the web page your customers will be re-directed to once the payment has not been successful.
- Payment Success URL: this is the web page your customers will be re-directed to once the payment has been successful.
- Set As Default: Determines whether this is the default Stripe Account to use in the current Business Central company.
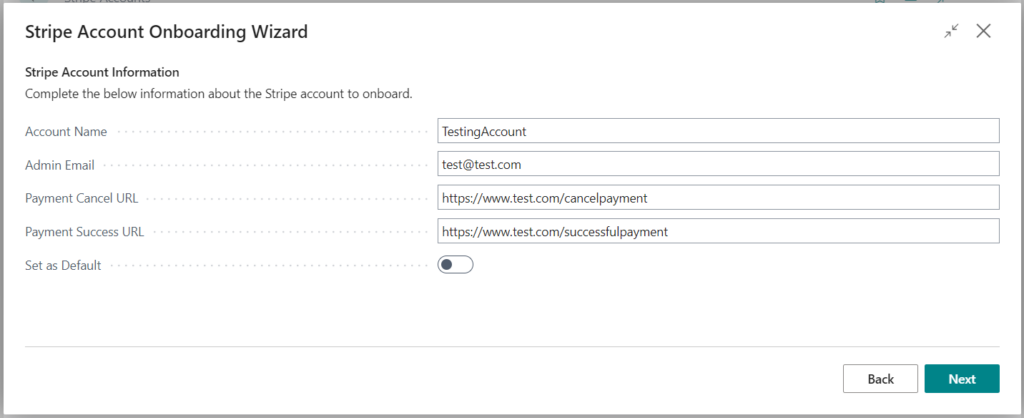
Once all details have been inserted, click on Next.
Step 4
In this step, the onboarded account is to be tested to ensure that it has been onboarded successfully.
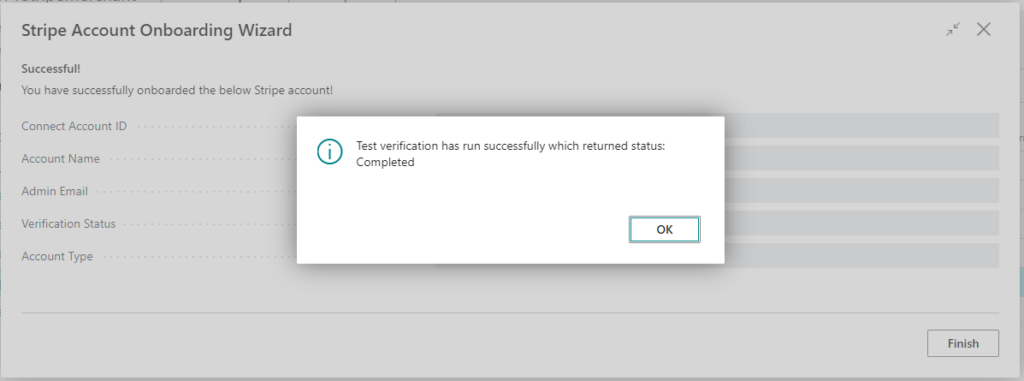
- Click on Test Account
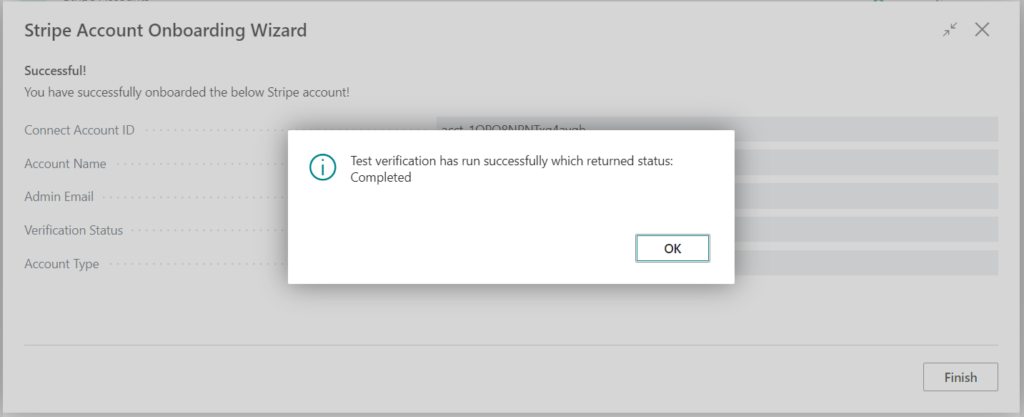
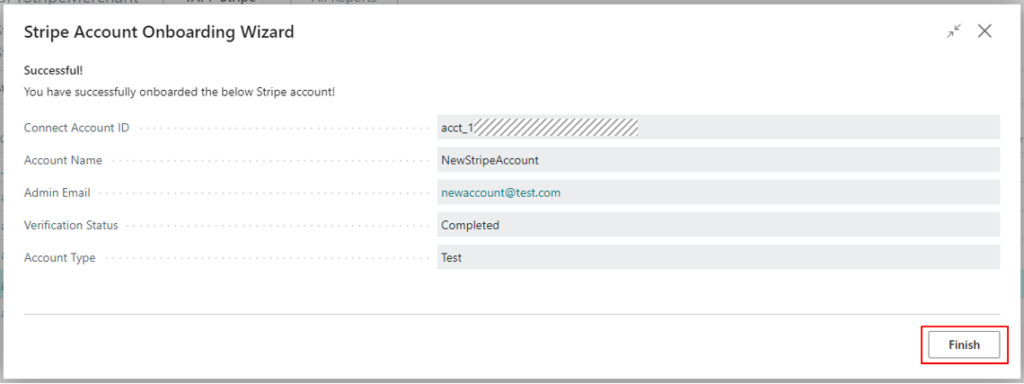
If verification is successful, a successful message will be shown to confirm that the account has been fully onboarded and you can proceed to Finish the wizard.
If the account verification returns a status of ‘Restricted’, this means that while the account has been onboarded successfully to TAPP, the Stripe account is still resulting to be Restricted on the Stripe side and therefore you will face limitations when using this account. In such cases, the below message is shown upon account verification;
“Your account was onboarded but Stripe marked it as restricted. Please update your account on Stripe then run the test verification on the Stripe account card.”
You can proceed to Finish and close the wizard at this stage. Once the account restrictions are cleared from Stripe, the account verification is to be run again in Business Central via TAPP – see more here.
Onboarding a new Stripe Account
To onboard a new Stripe Account, navigate to the Stripe Accounts page and click on Run Stripe Onboarding Wizard.
The launched Stripe Account Onboarding Wizard will walk you through the steps required to onboard a Stripe Account in the currently opened company.
Step 1
The first screen in the wizard is the Welcome screen, designed to initiate the onboarding process. Click on Next to proceed.
Step 2
In this step, the wizard provides both options to either create a new Stripe account or connect your existing Stripe account. In the account Onboarding Type dropdown, select Create New Stripe Account, then click on Next.
Step 3
In this step, additional details about the Stripe Account are to be provided.
- Account Name: Insert a name to identify the Stripe Account throughout the use of the account in Business Central.
- Admin Email: Insert the Stripe account email or an admin email address.
- Payment Cancel URL: this is the web page your customers will be re-directed to once the payment has not been successful.
- Payment Success URL: this is the web page your customers will be re-directed to once the payment has been successful.
- Set As Default: Determines whether this is the default Stripe Account to use in the current Business Central company.
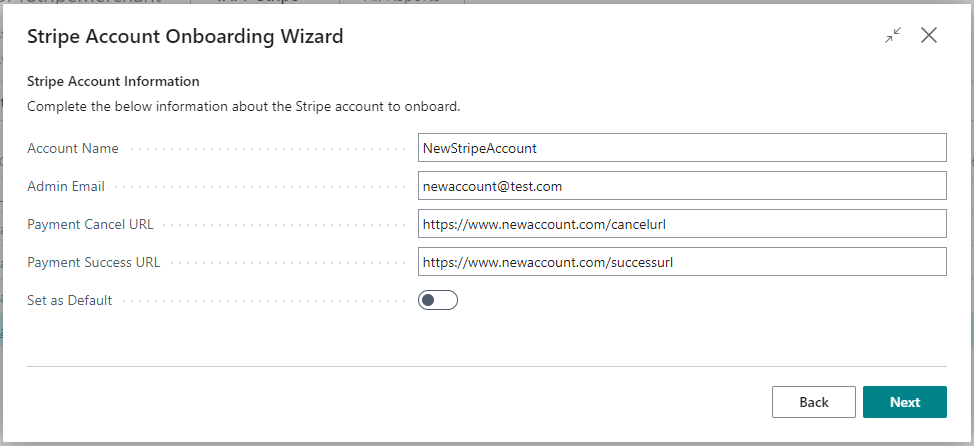
Once all details have been inserted, click on Next.
Step 4
In this step, an Onboarding URL is generated through which a Stripe Connect Account will be created.
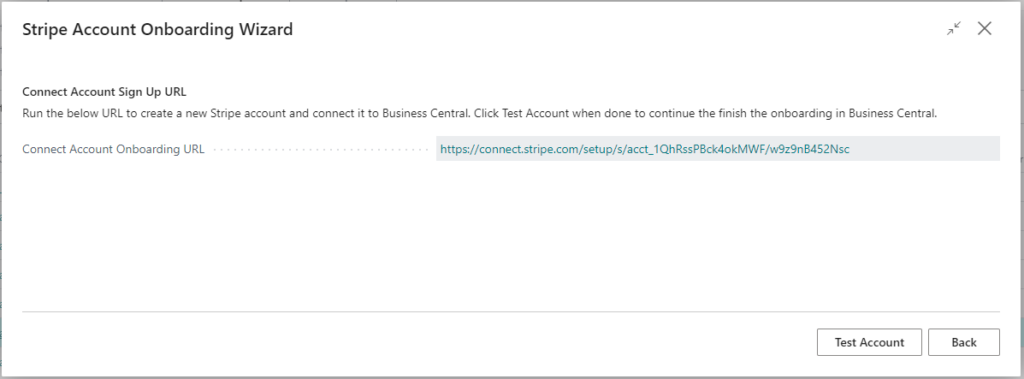
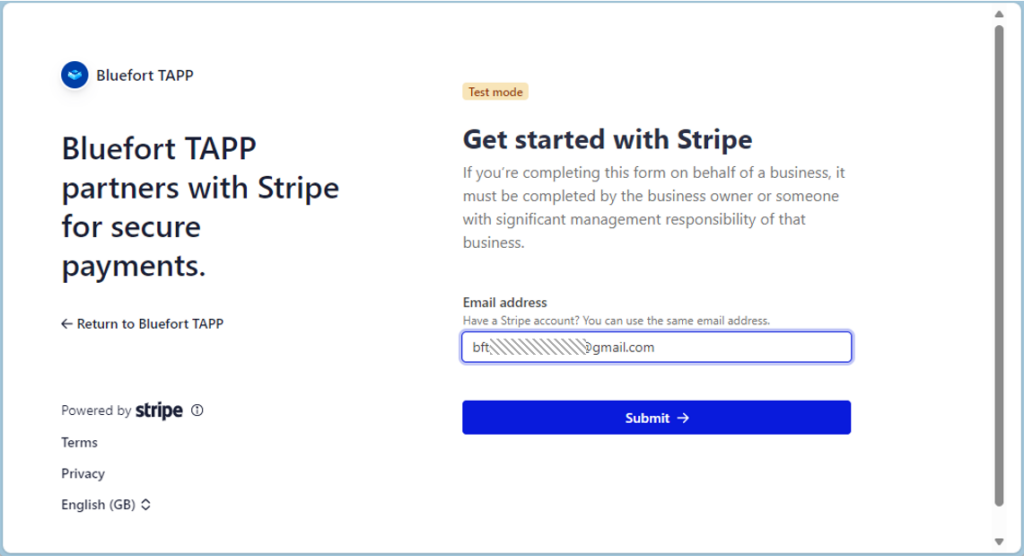
Click on the provided URL to open the Stripe log in screen and insert the e-mail address with which to create the Stripe Account. Proceed with the login process in Stripe.
Once all details have been inputted and the account is created, you will be redirected to the screen below to confirm that account has been successfully onboarded.
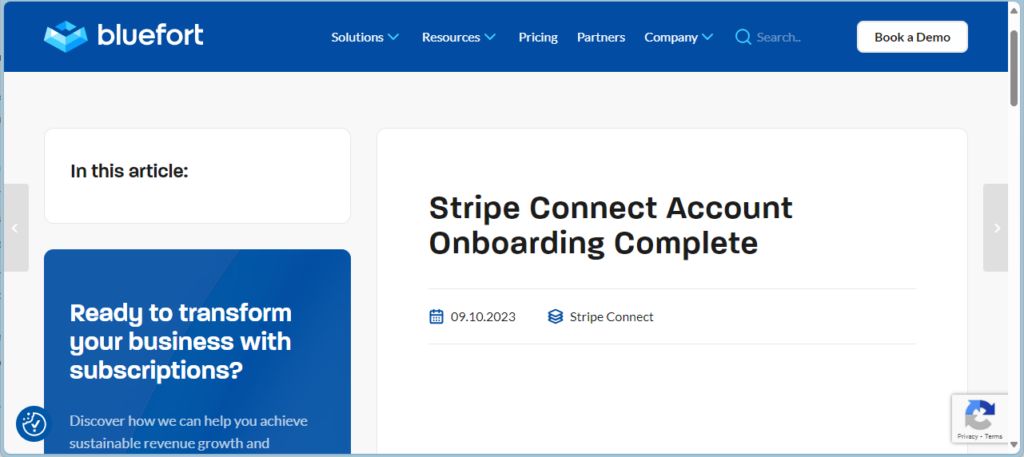
Close this page and return to Business Central.
Click on Test Account – if the verification goes well, the below success message is shown.
Click on Finish to close the wizard and complete onboarding.
If the account verification returns a status of ‘Restricted’, this means that while the account has been onboarded successfully to TAPP, the Stripe account is still resulting to be Restricted on the Stripe side and therefore you will face limitations when using this account. In such cases, the below message is shown upon account verification;
“Your account was onboarded but Stripe marked it as restricted. Please update your account on Stripe then run the test verification on the Stripe account card.”
You can proceed to Finish and close the wizard at this stage. Once the account restrictions are cleared from Stripe, the account verification is to be run again in Business Central via TAPP – see more here.
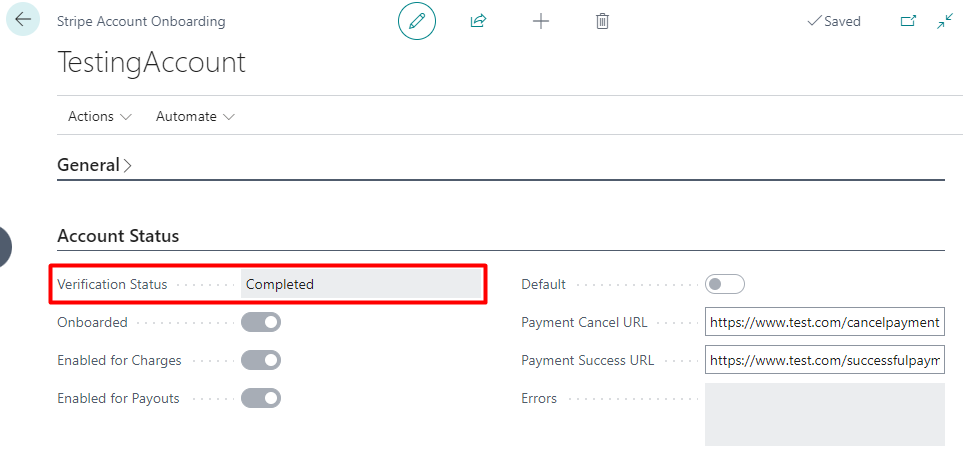
Verify Account
During the onboarding process, the Stripe account is tested for verification to make sure that the account does not have any usage restrictions. Whenever an Stripe Account is to be tested for verification, this can be done from the Stripe Accounts list within Business Central as follows;
- Open the Stripe Accounts list and open the account to verify. Click on Test Verification.
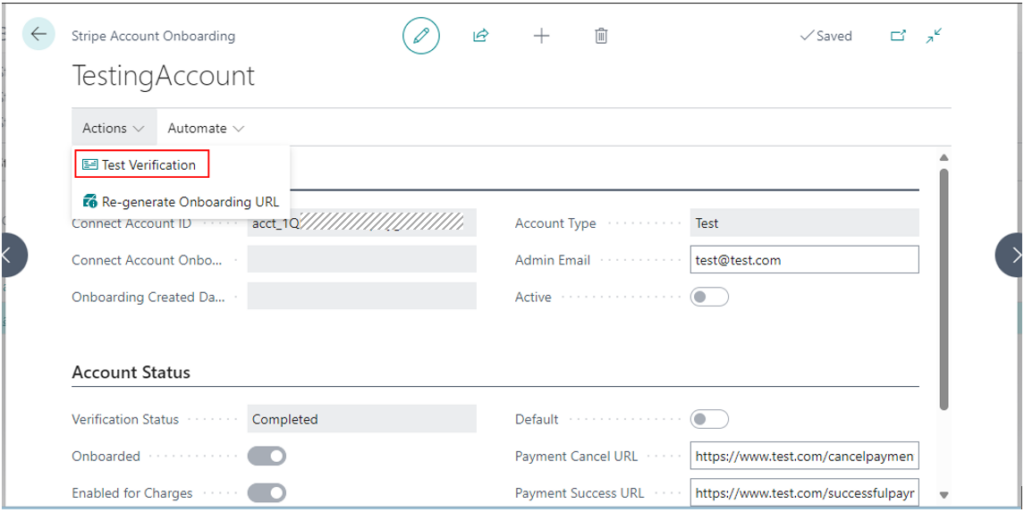
- The field Verification Status is updated accordingly.